How to Connect Redshift Database Using Sql Workbench
Connect to your cluster by using SQL Workbench/J
Amazon Redshift doesn't provide or install any SQL client tools or libraries, so you must install any that you want to use with your clusters. If you already have a business intelligence application or any other application that can connect to your clusters using a standard PostgreSQL JDBC or ODBC driver, then you can skip this section. If you don't already have an application that can connect to your cluster, this section presents one option for doing so using SQL Workbench/J, a free, DBMS-independent, cross-platform SQL query tool.
Install SQL Workbench/J
The Amazon Redshift Getting Started Guide uses SQL Workbench/J. In this section, we explain in detail how to connect to your cluster by using SQL Workbench/J.
To install SQL Workbench/J
-
Review the SQL Workbench/J software license
. -
Go to the SQL Workbench/J
website and download the appropriate package for your operating system on your client computer or Amazon EC2 instance. -
Go to the Installing and starting SQL Workbench/J
page. Follow the instructions for installing SQL Workbench/J on your system. SQL Workbench/J requires the Java Runtime Environment (JRE) be installed on your system. Ensure you are using the correct version of the JRE required by the SQL Workbench/J client. To determine which version of the Java Runtime Environment is running on your system, do one of the following:
-
Mac: In the System Preferences, choose the Java icon.
-
Windows: In the Control Panel, choose the Java icon.
-
Any system: In a command shell, type
java -version. You can also visit https://www.java.com, choose the Do I have Java? link, and choose the Verify Java button.
For information about installing and configuring the Java Runtime Environment, go to https://www.java.com
. -
Connect to your cluster over a JDBC connection in SQL Workbench/J
Before you perform the steps in this procedure, make sure that your client computer or Amazon EC2 instance has the recommended Amazon Redshift JDBC driver. For links to download the latest drivers, see Download the Amazon Redshift JDBC driver. Also, make sure you have configured firewall settings to allow access to your cluster. For more information, see Step 4: Authorize access to the cluster.
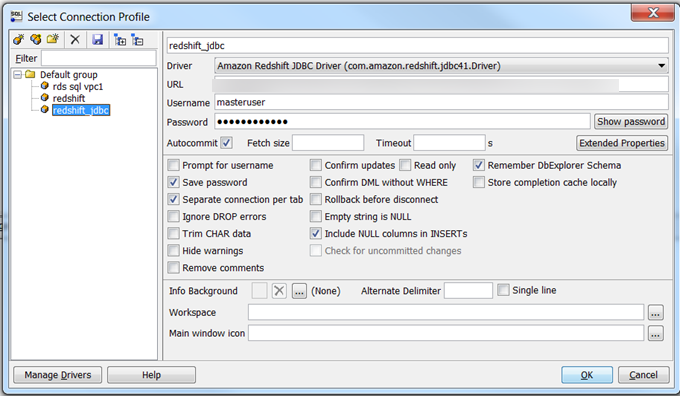
To use a JDBC connection in SQL Workbench/J
-
Open SQL Workbench/J.
-
Choose File, and then choose Connect window.
-
Choose Create a new connection profile.
-
In the New profile box, type a name for the profile. For example, examplecluster_jdbc.
-
Choose Manage Drivers. The Manage Drivers dialog opens. In the Name box, type a name for the driver.

Choose the folder icon next to the Library box, navigate to the location of the driver, choose it, and then choose Open.

If the Please select one driver dialog box displays, select com.amazon.redshift.jdbc4.Driver or com.amazon.redshift.jdbc41.Driver and choose OK. SQL Workbench/J automatically completes the Classname box. Leave the Sample URL box blank, and then choose OK.
-
In the Driver box, select the driver you just added.
-
In URL, copy the JDBC URL from the Amazon Redshift console and paste it here.
For more information about finding the JDBC URL, see Configuring a JDBC driver version 1.x connection.
-
In Username, type the name of the admin user.
If you are following the Amazon Redshift Getting Started Guide, type
adminuser. -
In Password, type the password associated with the admin user account.
-
Select the Autocommit box.
-
Choose the Save profile list icon, as shown below:

-
Choose OK.
Test the SQL Workbench/J connection
After you configure your JDBC or ODBC connection, you can test the connection by running an example query.
-
You can use the following query to test your connection.
select * from information_schema.tables;If your connection is successful, a listing of records appears in the Results tab.

-
Alternatively, if you loaded the sample tables and data from the Amazon Redshift Getting Started Guide, you can test your connection by typing the following query into the Statement window:
select * from users order by userid limit 100;If your connection is successful, a listing of records appears in the Results tab.

How to Connect Redshift Database Using Sql Workbench
Source: https://docs.aws.amazon.com/redshift/latest/mgmt/connecting-using-workbench.html